
helen@hbxinnuorollforming.com
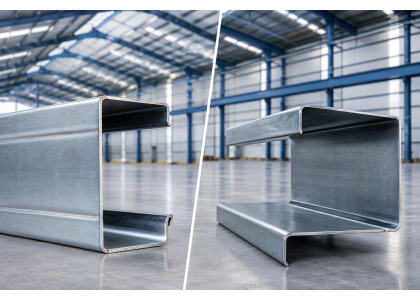
Walk onto any steel building construction site, and you will see rows of horizontal members supporting the roof and wall sheeting. Some are C-shaped, some are Z-shaped. To an untrained eye they look similar — but to a structural engineer, the difference between a C purlin and a Z purlin determines load capacity, span efficiency, and installation method. This article explains the key differences, when to use each, and how to choose the right one for your project.
A C purlin has a symmetrical C-shaped cross-section — a flat web with two equal flanges bent at 90 degrees, typically with a small inward return (lip) at the edge of each flange. The profile looks identical whether viewed from the front or the back.
A Z purlin has an asymmetrical Z-shaped cross-section — a flat web with two flanges pointing in opposite directions. Unlike the C purlin, a Z purlin looks different when rotated — the flanges point diagonally outward, creating a profile designed for overlapping at supports.
| Criterion | C Purlin | Z Purlin |
|---|---|---|
| Cross-Section | Symmetrical C-shape, equal flanges | Asymmetrical Z-shape, opposite flanges |
| Span Type | Simple span (supported at ends only) | Continuous span (overlapping at interior supports) |
| Deflection | Higher — each purlin bends independently | 30–50% lower — overlap transfers moment |
| Max Efficient Span | 6–8 meters | 9–12+ meters |
| Material Efficiency | Good — adequate for short spans | Better — thinner gauge can achieve same span |
| Installation | Easier — no orientation errors. Bolted directly to cleats or columns. | More care needed — flanges must face correct direction. Overlap length must be specified. |
| Nestability | Good — C sections nest for compact transport | Moderate — Z sections can nest but less compactly |
| Cost (same gauge, same span) | Lower steel cost per meter | Thinner gauge possible → total steel tonnage often lower |
| Typical Use Case | Wall girts, small roofs, mezzanines | Large-span roofs, PEB, heavy-load regions |
The most important distinction between C and Z purlins is structural — not visual. It is about how they behave under load.
In a simple-span setup, each purlin is supported at both ends — typically bolted to rafter cleats or column flanges. The purlin bends downward under load, with maximum deflection at mid-span. Each purlin acts independently. If you have four bays, you install four separate C purlins — each carrying its own section of roof load.
Structural behavior: Maximum bending moment occurs at mid-span. The purlin depth and gauge must be selected to keep deflection within allowable limits (typically span/150 to span/200 for roof purlins).
In a continuous-span setup, Z purlins overlap at interior supports by a specified lap length (typically 10–15% of the span). The lap joint transfers bending moment across the support, so the purlin acts as a single continuous beam across multiple bays. This dramatically reduces mid-span deflection — often by 30–50% — because the negative moment at the support counteracts the positive moment at mid-span.
Why lap length matters: A Z purlin with a 300 mm lap will not perform the same as one with a 600 mm lap. The lap must be long enough to develop the full moment capacity of the section at the support. Lap length is typically specified by the purlin manufacturer's load tables and should never be reduced without engineering approval.
Choose C purlins when:
Choose Z purlins when:
Yes — and it is common. A typical steel building design might use:
This combination is standard practice — it uses each profile where it performs best.
Both C and Z purlins are available in a range of standard sizes. While exact dimensions vary by manufacturer and regional standards, common sizes include:
| Purlin Depth (mm) | Flange Width (mm) | Lip Length (mm) | Typical Thickness (mm) | Typical Span Range |
|---|---|---|---|---|
| 100 | 50 | 10–15 | 1.5–2.0 | 3–5 m |
| 150 | 50–65 | 15–20 | 1.5–2.5 | 4–6 m |
| 200 | 65–75 | 15–20 | 1.5–3.0 | 5–8 m |
| 250 | 75–85 | 20–25 | 2.0–3.0 | 7–10 m |
| 300 | 85–100 | 20–25 | 2.0–3.0 | 9–12+ m |
The choice between C and Z purlins is not a matter of which is "better" — it is a matter of which is appropriate. C purlins excel in simplicity, wall girt applications, and short to medium spans. Z purlins dominate in long spans, heavy loads, and material-optimized pre-engineered building design.
The key decision factor is span length: under 8 meters, C purlins are often the simpler, faster choice. Over 9 meters, Z purlins with proper lap detailing deliver significant material savings and structural performance. In between? Consult your structural engineer and your purlin supplier's load tables — the correct answer is in the numbers, not a rule of thumb.
And for manufacturers serving both markets: a CZ integrated purlin machine that can switch between profiles in under a minute gives you the flexibility to supply whatever your customers need — no compromises, no lost orders.
Hebei Xinnuo is a professional cold roll forming machinery manufacturer with 20+ years of experience. We specialize in C/Z purlin machines, roof panel roll formers, floor deck machines, and custom profile solutions — exported to 50+ countries worldwide.